Just another WordPress.com weblog

Learning to Add and Subtract Through Storytelling

Here’s a creative way to help young children understand the difference between addition and subtraction. As I work on math with children in the primary grades, I have observed that while they often have an intuitive grasp of simple mathematics, they don’t connect their understanding to abstract symbols. For example, a child will definitely understand that if his best friend moves away, he has lost one friend. If, however, he sees the math problem 2-1=1, it has no meaning whatsoever.

I try to help children draw a bridge between their innate sense of math gained from real world experiences and math symbols, while also keeping them engaged and focused on the lesson. One powerful way to help focus a young child on the task is by engaging him in a storytelling process. Here’s what I did the other day with an antsy first grader.

Materials: A dry erase board, a range of colorful markers, and some kind of fun manipulatives. I have a set of colorful rubber dinosaurs and another set of cardboard ladybugs.

Activity: I lay my two-foot long dry erase board on the floor and drew a line across the middle of it. I asked the child to draw a dinosaur’s house on the top half of the board. Then I asked him to draw a park on the lower half.

To model what I wanted, I told the first story:

I placed two dinosaurs in the house and put about ten in park. I told the child that the two dinosaurs in the house were getting ready for a big party. They were going to invite some dinosaurs from the park to have supper with them. I asked the boy to move some of the dinosaurs up from the park to the house. He moved about six up to the house. Then I took another dry erase board and asked him to write down the number of the dinos that had been in the house first. He wrote down two. I then asked if he knew what symbol we would use to show that more dinos came to the house. He couldn’t remember, so I drew a plus sign, a minus sign and an equal sign. He then chose the correct symbol. I said, “This plus sign means more dinos came over to the party.” When I asked him to tell me how many dinos there were at the party after six more showed up, he counted all the dinos and told me the correct answer of eight. So I said, “If you have two dinos and six more show up, then the total number of dinos equals eight.” He nodded.

I then continued the story by saying some of the dinos were getting tired and so three of them went back to the park to take a nap.

We then associated each part of the story to the numbers and symbols he used to write an accompanying math sentence. He continually struggled to remember which math symbol stood for plus and which stood for minus.

After modeling a few more “chapters” of the dino party story, I asked the student to be the storyteller. I told him, “You tell me a story that has to do with dinos coming and going, and help me write the math sentences for it.”

That put him in charge, and then the real fun (and probably deeper learning) began.

At first, he couldn’t think of any ideas. So I said, “Well what if the house was haunted?” That unleashed his creative flow. He said, “Seven dinos walked up to the house and they went inside. They wanted to see what was inside.”

I asked, “Was the house empty before they got there?”

When he said yes, I asked, “What number lets us know that no one is there?” He thought for a while and then wrote down a zero.

I asked, “So if six dinos came up from the park, then how would we write that. He put his two fingers together to form a cross and asked, “Is this plus?”. When I affirmed that it was, he wrote it down. When I asked, “So how many dinos showed up at the house?” he wrote down 6. When I asked, “How many dinos altogether,” he understood there were six…although he wasn’t sure how to write the equals symbol.

Then he said, “A ghost jumped out and said boo! Then two dinos got scared and ran back to the park.”

When I asked him to write what he’d just described in a math sentence, he still looked confused. So I broke it down again for him with questions.

1)    How many were at the house before the ghost jumped out? He wrote down 6.

2)    What’s the symbol you use when dinos leave? He wrote down a minus sign.

3)    How many dinos left? He wrote 2.

4)    So then how many dinos were still at the house? He said 4.

5)    So what’s the symbol you use to show that if you have 6 dinos and 2 leave that 4 are still left? He wrote down the equals sign.

Then he happily made up several more sentences. Here’s one example of what he said. “The two dinos that ran back to the park told the other dinos about the ghost. Then five dinos wanted to see the ghost. They went to the house.”

We stopped to write that part of the story as a math sentence. He continued, “Then a witch came out and said boo! Eight dinos ran away!” He was laughing with delight!

While he was having fun creating stories, he was also slowly infusing the meaning of his stories into what he formerly viewed as meaningless math symbols.

The next time I saw him, he was much faster at applying the correct symbols when he translated his stories into math language. Best of all, the whole experience was fun rather than stressful.

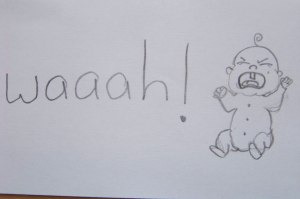
Remembering the wide variety of English vowels sounds can be a daunting task for emergent readers. Just getting down the subtle differences between the short sounds can be tricky. Then they have to learn a seemingly endless variation of vowel pairs.

"Crying Baby" image for short a

"Crying Baby" image for short a

To help emerging readers remember vowel sounds, I show them images that function as a visceral mnemonic device. Instead of remembering a specific word that has that vowel sound, I show an image of people/animals/objects that look as if they might be making that sound. In some instances, the image triggers the child to make the sound (the cute kitten makes children want to say the vowel pair “aw”). I then name the sound with a short phrase.  I also include the letter or letters on the card.

Short a: Image of a crying baby with a wide open mouth and the word “waaaah” next to it; Crying Baby sound

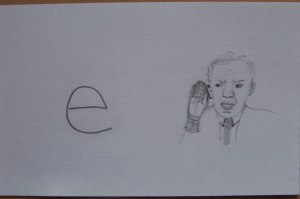
Short e: Image of an older person with a hand cupped behind his ear appearing to say “eh”; “Speak Up!” sound

Short i: Image of a person sneering; Disgusted sound

Short o: Image of a child opening his mouth saying “ah” for the doctor; Doctor’s Visit sound

Short u: Image of a person looking confused and asking “What?”; Asking a Question sound

Whenever a child mispronounces or forgets a vowel sound, I move the appropriate flashcard above the word to prompt her memory of it.

Whenever I pull out the card, I say the short phrase that goes with it. Eventually, all I have to say is, “it’s the ‘Doctor’s Visit’ sound” to trigger a memory of the sound itself.

After a few times of looking at the images, some children remind themselves of the sound by first making the same expression as the face in the image or by acting out what they see in the image. One girl put her hand behind her ear to remind herself of the short e sound.

"Eh, speak up" image for short e

"Eh, speak up" image for short e

I’ve also created flashcards for vowel pairs that seem especially hard for beginning readers to remember. I then write all the most common spellings that make the sound on the flashcard. I give each of these cards a short name.

er, ir, ur: Cartoon image of a growling dog; Growling Dog sound

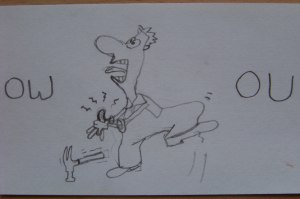
ow, ou: Cartoon image of a man who has just hammered his thumb and is obviously shouting “ow!”; Hammer Thumb sound

ew, oo: I found a funny image of two carved pumpkins in which one appears to be vomiting it’s innards and another appears to be looking at it and saying “ew”; Barfing Pumpkin sound.

aw, au: Cartoon image of an adorable kitten that makes you want to say “awwwww” when you look at it; Cute Kitten sound.

I try to find images that are silly or appealing as that helps lighten the load of learning vowels.

"Ow, my thumb" image for vowel pairs ow/ou

"Ow, my thumb" image for vowel pairs ow/ou

Here’s a fun exercise parents can do with their children during the summer months to develop language arts skills. Encourage your children to tell you stories and act as their scribe. If a child is old enough to tell a story, then she is old enough to do this exercise.

Some children in the elementary grades will sit down and write stories by themselves. But you can often entice a reluctant writer to tell a story if you offer to write it down for them. When the adult writes, the child’s energy is freed up to develop ideas and to use more sophisticated vocabulary. When I transcribe stories told to me by tutoring clients, I often ask questions to help students develop or clarify ideas. I also let students know they can always edit the rough draft later if I don’t write it down exactly right.

When I first started this writing exercise with children, I worried that I might be discouraging students from picking up the pencil on their own. In actuality, all of my older students eventually took the pencil out of my hands and took control of their own writing process.

Here are some tips for getting starting with storytelling.

For older children:

After reading a book, they can –

•   assume the identity of a character, but give the character their own unique spin. Tell children they can make different decisions from the actual character and change the outcome of the story.

•   write a sequel.

•   take the genre of the story such as action, mystery or fantasy, and write a story in this same genre.

•   choose a theme from the story such as making a new friend after a move or standing up to a bully, and write a story incorporating the same theme.

For younger children:

•   Ask if you can listen to their play with dolls, legos, etc. and write down dialogue and action. Ask questions to glean more information about what’s happening and where’s it’s happening.

•   Ask them to tell you a story about something that they did that day. At first, they might just relay the sequence of an ordinary event. Then, you might ask them to pretend something more extraordinary happened and add that into the mix (As in To Think That I Saw It On Mulberry Street by Dr. Suess). Or, you could ask them to make up a problem that happened during the event and to describe how the problem gets solved.

•   Give them more direction regarding the structure of a story. I hand out a sheet divided into beginning, middle and end. The beginning asks the writer to introduce characters and setting, the middle instructs the writer to describe an exciting or scary scene, and the end instructs children to create a happy ending.

If a child still has a hard time getting started, set the opening scene yourself. Recently, I read a story about aliens with a rising second grader. He was interested in the subject, but when I asked him to write a story about his “personal” encounter with an alien, he developed writer’s block. So I wrote the introductory line:

I was playing with legos in my bedroom, when I saw a strange flickering light through my curtains. When I peeked out, I saw what looked like a flying saucer in my back yard. I ran down the stairs and out the back door just as a door on the ship slid open….

After I set the scene, my client jumped in and wrote the rest.

Another strategy for overcoming writer’s block is for the adult to offer to be one of the characters in the story. You and your child can develop a dialogue together or take turns writing scenes from each character’s point of view. For example, after reading The Berenstain Bears and the In-Crowd with a rising fourth grader, the student decided to write a story  based on her own experience feeling snubbed by the popular clique at her school. In the sequel, I played the role of one of my student’s former friends who had joined the clique, and she played herself. My client became totally engrossed in writing this story.

One great outcome of this activity is that children get to see that they don’t always need external stimulation like T.V. or video games for entertainment. They get a taste of being entertained by their own imaginations.

Action Phonics

I see several first and second grade children for whom sitting still is a bit of a nightmare. To accommodate, I make my pre-reading activities as active as possible. Two examples:

Step-on-it Word Families:

"Step-On-It" Word Families

Step-On-It Word Families

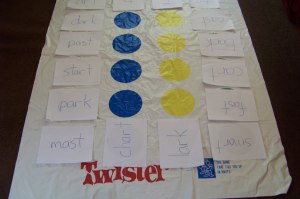
First, I identify three word families from a story we’ll be reading. I write five or six words all belonging to the same family on 8.5″ by 11″ card stock or foam. I use as many words as I can from the story and make up the rest.  Then I tape words to circles lining the perimeter of a Twister mat. I make sure words with the same endings are placed a few circles apart. The first three words represent one word from each of the three word families. The child steps on the first word and says it aloud. Then as she walks around the perimeter, she can only step on words from the same family. Sometimes, the word families are similar such as “ark” and “art”. If a child steps on the wrong word, I just take time to slowly sound it out until she can hear the difference. I also tell her to look for words with the same ending letters. Once the child has completed one round, she returns to the beginning and steps on the second word. She repeats the activity until all word families have been stepped on.

Some children like to be timed doing this activity. The first walk around is just for practice. Then I pull out the stopwatch. For some, this is a great motivator for increasing their fluency.

Hit the Vocabulary Word:

Pitching at Vocabulary

Hit the Vocabulary Word

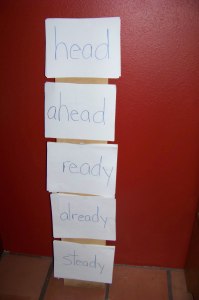
First, I choose five new vocabulary words from the story and write them each on an 8.5″ by 11″ piece of paper. I fasten them vertically to a wooden plank that I prop upright against the wall. The most effective way I’ve found to make the paper stick to the wood is using adhesive putty.

To begin the activity, I make sure the child can pronounce each word and understands its meaning. Then I ask the child to pitch the ball at the first word and to say the word aloud as the ball hits its target. I tutor some struggling readers that will practice reading these words over and over as they strive to hit each target perfectly. Sometimes the plank falls over with a big crash, but since that only adds to the fun, I haven’t yet attempted a way to connect the plank to the wall.

As the school year draws to a close, I hear from many parents who have received a warning from the elementary teacher that their child is in danger of failing. They want to know what I think. Should they agree to keep their child in the same grade for another year?

During the elementary school years, teachers often hold children back because of low reading skills. So I tell parents that before I can advise them, I have to figure out the reasons for their child’s reading problems.

  • Is a visual processing problem, or ADD making reading a struggle?
  • Is the child an English Language Learner with a limited vocabulary in English?
  • Is the child emotionally shut down for some reason? Maybe it’s from a divorce or family problems.

Once we know the reasons behind the problem, then it’s important to understand how retention might benefit them. For some children, repeating a grade might help them finally understand the material. This is more likely to happen if the school changes its approach towards the child. Otherwise,  repeating a year using the same approach probably won’t make much of a difference.

So, before you decide to hold back your child, see if the school plans to connect your child with a special education teacher, tutor or counselor who can address your child’s needs.

Although I believe some children benefit from repeating a grade, I’m inclined to suggest that parents try other alternatives first. What concerns me about retention is that many of the children I’ve seen who have been retained, continue to have the same problems or develop new problems.  New problems can develop because of the negative consequences of holding children back.

  • Children are separated from their friends. This can be destabilizing and demoralizing.
  • Children can get the message that they are stupid and this can actually make them do worse the next year.
  • The content and delivery of the former grade is no longer appropriate for the older child. Just because they may have a reading problem doesn’t mean they have a thinking problem, and they become bored.  One smart fourth grade boy who read slowly, was retained and put into the lowest level reading group. They were reading fairy tales in an easy-reader format. He lost all motivation to read and his grades sank.
  • As children get older, they enter puberty sooner than their peers. This can cause problems regarding how they relate in a classroom. I tutored a student who had been held back in a younger grade and in sixth grade, at thirteen, he was much bigger and more developed than anyone else in the class. He also did not have the same conforming emotional temperament as his peers. He challenged the teacher and avoided his classmates. The teacher was not prepared to deal with a full-blown adolescent in her sixth grade class. She reacted by doing her best to isolate him from the rest of the class, going so far as bringing in a study carrel to hide him from his classmates. Her reaction only increased his sense of shame and isolation, and led to more acting out.

Sometimes schools are willing to promote a child to the next grade despite low grades if they know parents will seek extra help for their child in a summer school program, or by finding a tutor. If your child has special learning needs, try to find a tutor that can address those needs.

Bottom line here, most children don’t benefit from repeating the same old thing. They need a new approach. One that addresses their specific challenges.

Most primary grade students are terrific phonetic spellers. I like to acknowledge this as a strength before teaching them “proper” spelling. I let them know that their phonetic spelling shows me how carefully they listen to the sounds in each word and also how accurately they choose letters to express those sounds. I tell them it makes perfect sense why a beginning speller would write “kam” for came or “jran” for drain. Then I deliver the bad news that proper English spelling often does not follow these logical sound/letter connections that they’ve discovered.

Happily, many children make the transition from phonetic spelling to English spelling just fine. Hours of reading and some spelling tests help children recognize common spelling patterns and memorize irregular spellings.

However, children who are highly auditory or children who have visual processing problems may not make the transition easily, especially since English  has many spelling irregularities. Since, there are many ways to write the same sound and many silent letters, it helps to have a strong visual memory when learning how to spell in English.

Here’s a multi-sensory strategy I use for children who are not making the transition easily. It includes sound and rhythm in addition to visual clues.

Materials: two rackets or ping pong paddles, a balloon, paper and markers

First, I choose a word from a writing assignment that a child has misspelled. Second, I have the child write the word correctly in big, colorful letters on a piece of paper. I prop the paper up so the child can easily see it. Third, we each take a racket and stand a ways apart from each other. The child takes the balloon and hits it to me as s/he says the first letter of the word. I hit the balloon back as I echo the first letter. Then the child says the first two letters of the word as s/he hits it to me and I repeat those first two letters as I hit the balloon back. If the word is longer than 2 letters, I ask the child to hit the repeated letters up in the air one at a time and then as they say the new letter, hit it over to me. I then repeat the same thing. After we’ve completely spelled the word, then the child hits the balloon to me pronouncing the word and I repeat it back. Finally, I hide the paper with the spelled word on it, and see if the child can repeat the proper spelling from memory. If not, we repeat some or all of the process.

I use this approach with a third grader who has a visual processing disorder. She has a hard time tracking letters from left to right as she reads. She’ll say the end of a word first or just start speaking gibberish as she sounds out letters at random. This disorder has made it hard for her to remember letter patterns, so she still heavily relies on phonetic spelling.

Here’s a typical sample of her writing:

“Jack ran whit the hen and slid down the beanstok befor the gient could get him.”

After we played the balloon game, she rewrote the sentence with no mistakes. She told me the game helps her remember how to spell because she imagines herself hitting the balloon and saying the letters correctly.

Here’s the follow up to my blog post, Helping Kids Organize their Ideas. In the previous post, I showed a fourth grader’s brochure about Japan’s tsunami/earthquake disaster. Making the brochure is an effective pre-writing activity that helps children develop and organize their ideas.

Three Panels of the Brochure

Once a student’s brochure is complete, we review it together. I ask students to identify the main topics and supporting ideas. They can easily see that the topics are the headers on each panel and the supporting ideas are the bulleted phrases below. Each supporting idea has a visual to go with it and the visual helps kids remember details about the subject.

As we review the brochure, I check in with students to see if each topic is general enough to include all the supporting ideas. For example, one of my students created a brochure about wildfires and when we looked at the panel about effects of wildfires, she said the topic should be Wildfires Hurt Animals. I showed her that not only did she have a photo of an injured animal on the page, but she also had a photo of a boy wandering through the ashes of his former house. After looking at these two images, the student changed her topic to Wildfires Hurt Animals and People.

After identifying the topics and supporting ideas, I ask students to develop these into complete sentences. At first, many of my students have a hard time forming ideas and writing them down simultaneously.  These students benefit from dictating their ideas as I write them down. Since I’m doing the writing, they are willing to include more details and use more sophisticated vocabulary. As they tell me what to write, I often ask questions to trigger further development of their ideas. I’ve noticed this intermediate step leads to better writing down the road. Listening to themselves develop ideas as they speak, helps them apply the same skill as they write.

The fourth grader who created the Japan brochure (shown at the top of the page), actually asked to start writing the essay himself about half way through. I printed out what we had started, and he finished the rest of the essay just by looking at the brochure panels. This child had been struggling to write even one sentence about topics in school and the brochure/discussion approach enabled him to write a well-organized essay.

Most of my upper elementary students have a hard time sorting their ideas by topic and developing their ideas. Creating a brochure can help students organize their ideas in a way that is easy for them to transform into paragraphs.

Brochure Panels for Japan's Tsunami

Here’s how the process works. First I find an article or two about a current event. I often search for articles on the Time for Kids website. Time for Kids publishes magazines for students in grades K-6. I also search for images that illustrate main ideas expressed in these articles. I put all the images on one page and print them out.

Before students read any articles, I take them through a two-step pre-reading exercise. First, we look at all the images and discuss them. I ask them if they know what’s happening in the image and how it relates to the topic. If they don’t know, I explain the connection. This helps students expand their background knowledge of the topic before they read about it. For example, when I had students study the recent earthquake/tsunami disaster in Japan, I printed out several images related to the topic and we discussed each one of these images.

The second step is showing students the different headers on each page of the brochure. The headers for the tsunami brochure say: Main Idea, Causes, Effects, How Japan Prepared, Definitions and Special Report. I show them these headers to help them organize ideas into topics as they read. After looking at the topics, they read the articles, sometimes highlighting ideas that relate to one of the topics. Then they sort the pictures by topic, cut them out and glue them to the appropriate panel. Last of all, students create a bulleted list of facts for each topic. Sometimes they write each fact as a sentence, but they also can write it as a phrase.

The fourth grade child who created the brochure shown in this blog had  been struggling to write even one sentence for school assignments. By talking about the subject repeatedly before writing about it, then using the images to help direct his thoughts back to our discussions, he was able to write several sentences containing vivid details.

Front and Back Panels of Tsunami Brochure

In my next blog, I’ll describe the process of taking ideas from the brochure and turning them into paragraphs.

Here’s a fun pre-reading activity to motivate beginning readers. Children create a 3-D scene from the story before they read it. This activity has multiple positive effects. First, it familiarize students with a story’s vocabulary and plot. This helps children do a better job of decoding words as they read and, consequently, they read more fluently. Second, it engages children in the story, sparking their imagination and bringing the story to life. My students often read with more expression after setting up the scene.

Little Bear Makes Birthday Soup

Setting up a scene takes a little preparation. I’m lucky that my own kids are young enough to still have dollhouse and Lego toys laying around. Other ways to collect toys for props could be garage sales or ebay.

After I set out the props needed for the story at hand, together we create a scene based on an illustration or just common knowledge about the story. For example, we look at Maurice Sendak’s illustrations to set up scenes from Little Bear stories by Else Holmelund Minarik. But, for Jack and the Beanstalk, we imagine our own version of scenes.

Mother Bear Brings the Birthday Cake

As we build the scenes, I name all of the props. For example, when we build the scene for Little Bear’s Birthday Soup, I ask students to make sure the basket contains all four vegetables that are needed in the birthday soup, and we name them aloud. We line up Little Bear’s friends in the order of their appearance in the story, naming each one. During scene creation, I also summarize the plot. I tell them that Mother Bear is missing on Little Bear’s birthday, so Little Bear has decided to take charge himself. Since he doesn’t know how to make birthday cake, he’s going to make birthday soup. I make sure to mention most of the story’s vocabulary before they begin reading. I’ve noticed that introducing vocabulary in this interactive, engaging way helps children remember how to pronounce words as they read.

Once the scene is complete, they begin to read. About midway through the story, we take a reading break so they can set up the birthday table scene. Again, I make sure to name all the props and explain the upcoming plot using words from the text. Then they finish reading the story.

All my struggling emergent readers love this exercise. I think the playful quality and repetition of vocabulary helps them feel relaxed and confident. It helps my English language learners understand and remember new vocabulary words. Even children who have a hard time sitting still and focusing are willing to settle down and read after they’ve set up the scene.

Some beginning readers have a hard time hearing differences between similar sounding letters. Sometimes they confuse the voiced and voiceless consonants such as d/t, b/p, and v/f. Sometimes, they have a hard time distinguishing between two voiced consonants or two voiceless consonants. When they see the letter g, they might say /g/ or they might say /d/. When they see the letter p, they might say /p/ or they might say /t/.

Most children can sort out subtle differences in sound just by listening. For others, it helps to have a second way of differentiating between sounds. I ask these children to focus on what’s happening physically when they make sounds.

Placing a hand on their throat and feeling the difference between a voiced and voiceless sound gives them another way to tell if they’re saying the sound correctly. So does helping them tune into what their lips, and tongue are doing as they make certain sounds.

The need to focus on the physical act of making a sound is usually transitory. Once the physical clues help them identify the sound they are trying to make, they have an easier time remembering it through auditory input alone.